Step by step guide on how to launch an AI chat bot on Slack. Takes no more than 10 minutes and no coding is required!
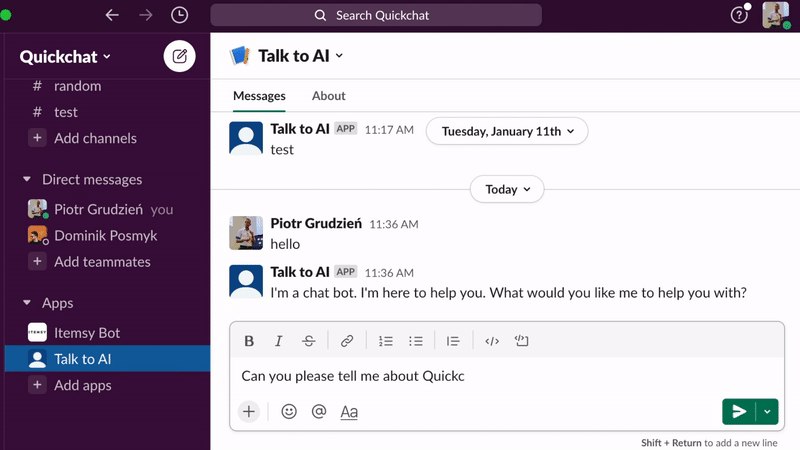
 This is what it’s going to look like once we’re finished
In this guide, we’re going to follow 4 simple steps to create a smart conversational AI that anyone can talk to in your Slack workspace:
- Create your Slack app
- Configure your Slack app
- Create a Quickchat.ai account
- Integrate your Slack bot with Quickchat.ai
1. Create your Slack app
The first thing you need to do is to create a Slack app for your AI chat bot. Head over to api.slack.com/apps, create a new app, and follow the steps:
 Create new Slack app
- Click Create New App.
- Select From Scratch (or use the provided manifest below if you’re experienced).
- Set your AI’s name and select the Slack workspace you want to add it to.
2. Configure your Slack app
Slack allows configuring your entire app in one go through a manifest file, which contains all of your app’s configuration.
 Create app from scratch. If you’ve done this sort of thing before, you can go directly to building from app manifest that we provide below
We prepared a manifest file that you can simply copy & paste without worrying about the details. If you’re interested, the important lines have been highlighted below:
- make sure your bot’s messages tab has been enabled
- set permission scope for bot so it can read and write chat messages
- set the appropriate bot events to be handled by our Quickchat server
Copy & paste the following manifest file for a quick setup:
display_information:
  name: Talk to AI
  description: Talk to me about Quickchat!
features:
  app_home:
    home_tab_enabled: false
    messages_tab_enabled: true
    messages_tab_read_only_enabled: false
  bot_user:
    display_name: Talk to AI
    always_online: true
oauth_config:
  scopes:
    bot:
      - im:history
      - im:write
      - chat:write
settings:
  event_subscriptions:
    request_url: https://slack.quickchat.ai/chat/
    bot_events:
      - message.im
      - app_home_opened
org_deploy_enabled: false
socket_mode_enabled: false
token_rotation_enabled: false
Note: If you’d like your bot to respond to @mentions in channels, modify the manifest like this:
display_information:
 name: Talk to AI
 description: Talk to me about Quickchat!
features:
 app_home:
   home_tab_enabled: false
   messages_tab_enabled: true
   messages_tab_read_only_enabled: false
 bot_user:
   display_name: Talk to AI
   always_online: true
oauth_config:
 scopes:
   bot:
     - im:history
     - im:write
     - chat:write
     - app_mentions:read
     - channels:history
     - groups:history
settings:
 event_subscriptions:
   request_url: https://slack.quickchat.ai/chat/
   bot_events:
     - message.im
     - app_home_opened
     - app_mention
     - message.groups
     - message.channels
 org_deploy_enabled: false
 socket_mode_enabled: false
 token_rotation_enabled: false
Before you can set your manifest, you will be required to verify the URL by simply clicking on the link:
 Verify the URL by simply clicking on the link
That’s it! Your bot Slack app has been configured. If you’d like to edit your bot’s look & feel, head over to Basic information under Settings:
 Edit your bot’s name, description, icon and background color
3. Create a Quickchat.ai account
Quickchat.ai allows you to create your own AI Agent with advanced conversational skills.
- Start by creating your account at quickchat.ai
- Learn how to train your AI in this video tutorial
 Set up your Quickchat account
4. Integrate your Slack bot with Quickchat.ai
In the Quickchat AI dashboard, go to Integrations and select Slack.
 Quickchat AI Integrations section
 Activate your Slack integration and provide App ID, Signing Secret and Bot User OAuth Token
You will need:
- App ID → Found in Settings → Basic Information → App Credentials
- Signing Secret → Found in Settings → Basic Information → App Credentials
- Bot User OAuth Token → Found in Features → OAuth & Permissions → OAuth Tokens for Your Workspace
 Copy your App ID and Signing Secret. Remember, Verification Token is NOT your Bot User OAuth Token
You will first be required to install the bot to your Workspace:
 Set the welcome message
As a final step you may set welcome message to be sent by the Assistant at the beginning of their conversation on Slack:
 Set the welcome message
And that’s it! 🎉 Your AI chat bot is ready to be tested on Slack.
End goal - smart conversational AI that anyone can talk to in your Slack workspace
If you’re ready to build your own AI-powered Slack bot, visit quickchat.ai and start building today!